使用Masonry框架来构造iOS布局
之前一直都是在使用storyboards来创建iOS布局,突然某一天看到使用代码布局后,界面元素的清晰易懂,就迷上了。。。
所以这次简单学习一下使用Masonry帮助构建iOS界面元素。
在阅读了Masonry的github主页之后,学习并安装了框架。
框架的安装
安装框架非常简单,我们只需要在podfile中加上下面一句:
pod 'Masonry'
之后为了语法的缩写以及代码自动补全我们来创建Code Snippets
mas_make -> [<#view#> mas_makeConstraints:^(MASConstraintMaker *make) { <#code#> }];

mas_update -> [<#view#> mas_updateConstraints:^(MASConstraintMaker *make) { <#code#> }];

mas_remake -> [<#view#> mas_remakeConstraints:^(MASConstraintMaker *make) { <#code#> }];
将上述语句放到~/Library/Developer/Xcode/UserData/CodeSnippets中,之后我们在写相关代码的时候就会有代码提示了。
我们在要使用Masonry的文件要频繁的导入"Masonry.h"头文件,所以为了方便,我们创建一个Supporting Files文件夹,并在其中创建一个prefix.pch文件。文件内容为:
//
//  MBMasonry-Prefix.pch

#import <Availability.h>

// Include any system framework and library headers here that should be included in all compilation units.
// You will also need to set the Prefix Header build setting of one or more of your targets to reference this file.

#ifndef __IPHONE_3_0
#warning "This project uses features only available in iOS SDK 3.0 and later."
#endif

#ifdef __OBJC__
#import <UIKit/UIKit.h>
#import <Foundation/Foundation.h>
#import <QuartzCore/QuartzCore.h>

//define this constant if you want to use Masonry without the 'mas_' prefix
// 只要添加了这个宏,就不用带mas_前缀
#define MAS_SHORTHAND

//define this constant if you want to enable auto-boxing for default syntax
// 只要添加了这个宏,equalTo就等价于mas_equalTo
#define MAS_SHORTHAND_GLOBALS
//在这里导入头文件。
#import "Masonry.h"

#endif /* MBMasonry_Prefix_pch */
之后我们在使用的时候,就不用每个文件都导入一遍头文件了。
使用方法
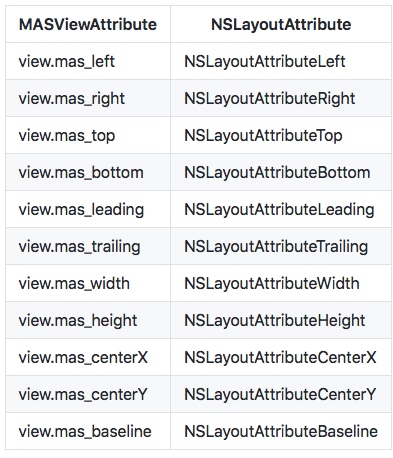
原声的iOS代码,对界面布局使用的是NSLayoutAttribute,用了Masonry后,我们使用封装好的MASViewAttribute。具体的属性等价关系如下图所示:

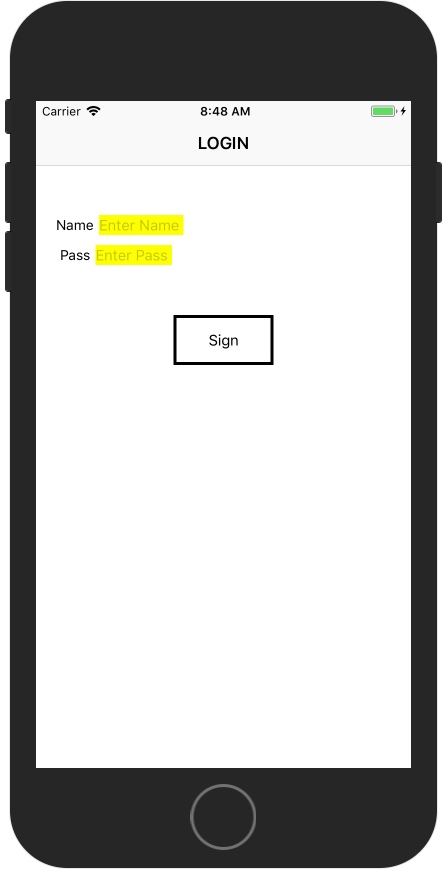
我们来举例说明一下,假入我们想要创建一个登陆界面。界面中要有Name和Pass两个TextField,并对应两个Label。
那么我们可以按照如下方式来写:
//
//  ViewController.m
//  FirstRAC
//
//  Created by 梁中豪 on 2017/10/17.
//  Copyright © 2017年 梁中豪. All rights reserved.
//

#import "ViewController.h"

@interface ViewController ()
@property(nonatomic,strong) UIView *login;
@property(nonatomic,strong) UILabel *nameLabel;
@property(nonatomic,strong) UILabel *passLabel;
@property(nonatomic,strong) UITextField *name;
@property(nonatomic,strong) UITextField *pass;


@end

@implementation ViewController

- (void)viewDidLoad {
    [super viewDidLoad];
    self.login = [[UIView alloc] initWithFrame:CGRectZero];

    _name = [[UITextField alloc] init];
    _name.borderStyle = UIFontWeightBold;
    _name.font = [UIFont systemFontOfSize:15];
    _name.placeholder = @"Enter Name";
    [_login addSubview:_name];

    _pass = [[UITextField alloc] init];
    _pass.borderStyle = UIFontWeightBold;
    _pass.font = [UIFont systemFontOfSize:15];
    _pass.placeholder = @"Enter Pass";
    [_login addSubview:_pass];

    _nameLabel = [[UILabel alloc] init];
    _nameLabel.backgroundColor = UIColor.whiteColor;
    _nameLabel.font = [UIFont systemFontOfSize:14.0];
    _nameLabel.lineBreakMode = NSLineBreakByTruncatingTail;
    _nameLabel.text = @"Name";
    [_login addSubview:_nameLabel];

    _passLabel = [[UILabel alloc] init];
    _passLabel.backgroundColor = UIColor.whiteColor;
    _passLabel.font = [UIFont systemFontOfSize:14.0];
    _passLabel.lineBreakMode = NSLineBreakByTruncatingTail;
    _passLabel.text = @"Pass";
    [_login addSubview:_passLabel];
    [self.view addSubview:_login];
    [self buildElem];
}

//为所创建的控件,创建约束
- (void)buildElem{
    [_login mas_makeConstraints:^(MASConstraintMaker *make){
        make.left.right.and.bottom.equalTo(self.view);
        make.top.equalTo(self.mas_topLayoutGuide);
    }];
    [_nameLabel mas_makeConstraints:^(MASConstraintMaker *make){
        make.top.equalTo(_login.top);
        make.height.equalTo(@20);
        make.left.equalTo(_login.left).with.offset(20);
    }];
    [_passLabel mas_makeConstraints:^(MASConstraintMaker *make){
        make.top.equalTo(_nameLabel.bottom).with.offset(10);
        make.centerX.equalTo(_nameLabel.centerX);
        make.height.equalTo(@20);
    }];
    [_name mas_makeConstraints:^(MASConstraintMaker *make){
        make.left.equalTo(_nameLabel.right).with.offset(5);
        make.centerY.equalTo(_nameLabel.centerY);
        make.height.equalTo(@20);
    }];
    [_pass mas_makeConstraints:^(MASConstraintMaker *make){
        make.left.equalTo(_passLabel.right).with.offset(5);
        make.centerY.equalTo(_passLabel.centerY);
        make.height.equalTo(@20);
    }];

}


- (void)didReceiveMemoryWarning {
    [super didReceiveMemoryWarning];
    // Dispose of any resources that can be recreated.
}

@end
从上面可以看到,我们为元素创建了约束。当然这只是基本的方法。还有更多的API接口可以使用。我们这里就不在过多说明了。
大概知道上面的用法,我们就可以开心的撸代码写界面去了。
:smile:smile:smile:smile:smile:smile:smile:
ReactiveCocoa初步了解
ReactiveObjC是一个受到函数响应式编程启发而开发的OC框架,对应的Swift框架叫做ReactiveCocoa or ReactiveSwift。简称为RAC。
不同于使用那些被替代和修改的可编辑变量,RAC提供了一个signals (represented by RACSignal)用于捕获当前或者未来的值。这种做法工作起来类似于KVO,但是却没有那么繁琐。
RAC的一大优势就是提供了一个统一的方法去解决异步表现,这些表现包括:委托方法,回调函数块,target-action机制,通知和KVO。
有如下例子:
//当self.name改变后,输出新的名字到控制台
//
//无论何时改变了值,RACObserve(self, username)都会创造了一个新的RACSignal用于发送当前self.name
// 不管在什么时候signal发送了一个新的值,-subscribeNext: 都将执行块方法.
[RACObserve(self, username) subscribeNext:^(NSString *newName) {
    NSLog(@"%@", newName);
}];
但是不想KVO通知,signals是可以被链接和操作的:
// 只输出以"j"开头的名字.
//
// -filter returns a new RACSignal that only sends a new value when its block
// returns YES.
[[RACObserve(self, username)
    filter:^(NSString *newName) {
        return [newName hasPrefix:@"j"];
    }]
    subscribeNext:^(NSString *newName) {
        NSLog(@"%@", newName);
    }];
其实上面代码也可以复杂的写成:
RACSignal *usernameSourceSignal = self.username;

RACSignal *filteredUsername =[usernameSourceSignal
  filter:^(NSString *newName) {
        return [newName hasPrefix:@"j"];
    }];

[filteredUsername subscribeNext:^(NSString *newName) {
        NSLog(@"%@", newName);
    }];
这是因为RACSignal的每个操作都会返回一个RACsignal,这在术语上叫做连贯接口(fluent interface)。这个功能可以让你直接构建管道,而不用每一步都使用本地变量。
Signals也可以被使用去获取状态。区别于观察属性和设置其他属性来反应新的值,RAC可以按照信号和操作来表达属性:
// Creates a one-way binding so that self.createEnabled will be
// true whenever self.password and self.passwordConfirmation
// are equal.
//
// RAC() is a macro that makes the binding look nicer.
//
// +combineLatest:reduce: takes an array of signals, executes the block with the
// latest value from each signal whenever any of them changes, and returns a new
// RACSignal that sends the return value of that block as values.
RAC(self, createEnabled) = [RACSignal
    combineLatest:@[ RACObserve(self, password), RACObserve(self, passwordConfirmation) ]
    reduce:^(NSString *password, NSString *passwordConfirm) {
        return @([passwordConfirm isEqualToString:password]);
    }];
还有许多用法这就不举例了,详细用例可以查看官方文档
使用时机
刚开始,可能很难理解RAC,因为这个ReactiveObjC很抽象,很难了解什么时机应该使用它,怎样去解决问题。这里有几个推荐的使用时机:
- 解决异步或者时间驱动的数据源
- 链接依赖操作(尤其在网络处理方面)
- 并行独立的工作
- 简化集合的转变
Copyright © 2017 Powered by LZH, Theme used GitHub CSS.


